Before anyone climbs a ladder
A roof replacement is one of the bigger jobs a Perth home goes through. The good news is that it follows a predictable sequence. Once you understand the stages, you can ask better questions, plan around the noise and spot whether the job is on track.
The steps below describe a typical full re-roof on a house. Every job is different, so your roofer may combine or reorder some stages.
Stage 1: Inspection and assessment
It starts with a proper look at the roof. Your roofer will check the roof covering, ridge capping, valleys, flashings, gutters and downpipes. Where possible they will also look in the roof space at the battens, sarking, timber frame and any signs of past leaks or termites.
They will also want to know what the roof is made of. Concrete tile, terracotta, steel and older asbestos cement roofs each need a different approach. Our guide to what happens during a roof inspection goes into more detail.
Stage 2: Choosing materials and getting a quote
Next comes the decision about what goes back on. Many Perth owners replace old concrete tiles with COLORBOND steel, others stick with tiles. Things to decide at this stage include:
- Material, profile and colour
- Sarking, roof blanket and ceiling insulation upgrades
- Gutter and downpipe style
- Ventilation such as whirlybirds or ridge vents
- Whether skylights, solar or aerials need to come off and go back
Your roofer then prepares a written quote. Compare quotes on scope, not just the final number. The roof replacement cost guide explains what affects pricing, and our guide to the best roofing materials for Perth compares the main options.
Stage 3: Contract, permits and registration
Once you choose a roofer, you should get a written contract. The Home Building Contracts Act 1991 (WA) applies to many residential building contracts and can cover deposits and home indemnity insurance. Consumer Protection WA explains how it applies.
Depending on the work, a building permit may be needed from your local government, particularly if the structure, weight or shape of the roof is changing. See does my roof need a building permit in WA. For residential work over $20,000, WA generally requires a registered building contractor; check with Building and Energy.
We ask the contractors we work with to hold the registrations and insurance the job needs. Ask to see them before work starts.
Stage 4: Scheduling and ordering
With paperwork sorted, materials are ordered and a start date is set. In Perth, many people aim for the drier months between October and April. Before the start, it helps to:
- Move cars, outdoor furniture and pot plants away from the house.
- Clear a spot for a skip bin and material delivery.
- Take fragile items off walls and high shelves, as vibration can shake them loose.
- Tell your neighbours roughly when the noisy days will be.
- Arrange for pets to be somewhere calm.
Stage 5: Site setup and safety
On day one, the crew sets up. That can mean scaffolding, edge protection around the roofline, or anchor points for harnesses. WorkSafe WA sets the rules for working at height. Gardens, paving and windows may be covered, and a skip bin or trailer goes in place.
Stage 6: Removing the old roof
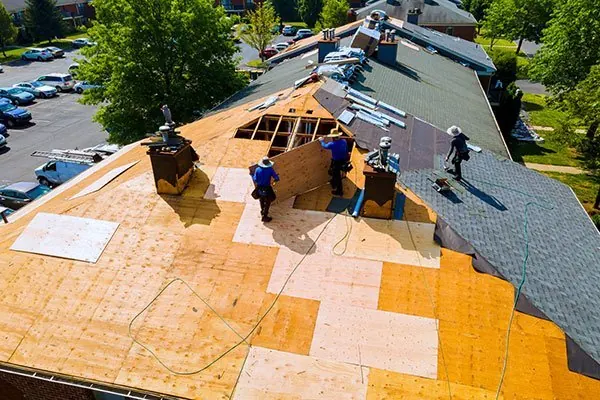
Strip-off is the loudest and dustiest part of the job. Tiles or sheets come off, along with old ridge capping, valley irons and, often, perished sarking. Crews generally open only as much roof as they can cover again the same day, keeping an eye on the weather.
If the roof contains asbestos
Older Perth homes may have asbestos cement roofing. WorkSafe WA requires a licensed asbestos removalist for removing more than 10 m² of non-friable asbestos. The removalist follows strict procedures for wetting, wrapping and disposing of the sheets. See our asbestos roof replacement page for how these jobs run.
Stage 7: Repairs to battens and frame
With the roof open, the frame is exposed. This is the moment to fix rotten or damaged battens, replace termite-damaged timber, straighten sagging sections and add tie-downs. When converting from tiles to steel, battens are often replaced or re-spaced, and extra fixings go in to resist wind uplift.
If something unexpected turns up, your roofer should show you, explain the options and agree any change in writing before going ahead.
Stage 8: Sarking, blanket and insulation
Before the new roof goes on, sarking or a reflective foil is laid over the battens. Under steel roofing, a roof blanket is commonly added to reduce rain noise, heat gain and condensation. If you are upgrading ceiling batts, this can be a convenient time to do it. Read more in roof underlayment and insulation.
Stage 9: Installing the new roof
Steel roofs
Sheets are lifted onto the roof, laid in runs and screwed down with the right fixings for your area. Coastal homes need fixings and flashings suited to salty air. Ridge capping, barge flashings, apron flashings and valley pieces are fitted.
Tile roofs
Tiles are laid onto battens in courses, with valley irons in place first. Ridge and hip capping is bedded and pointed, or mechanically fixed, depending on the system used.
Gutters, downpipes, whirlybirds and vents are fitted towards the end of this stage, along with re-flashing around chimneys, skylights and walls.
Stage 10: Clean-up and final check
Once the roof is complete, the crew should remove offcuts, screws, swarf and old materials, and clear the gutters. Steel filings left on a new roof can rust and stain the finish, so ask for a careful sweep.
Walk around the house with the roofer if you can. Look at the rooflines, gutters and downpipes, and ask about anything that looks unfinished. Keep the invoice, product information and maintenance notes with your house records.
Living with the work
Most families stay at home during a re-roof, but a little planning makes the days easier.
- Noise. Strip-off and screw-fixing are loud. If anyone works from home or has a baby who naps, plan around the first few days.
- Dust. Fine dust and old debris can drift down through downlights and manholes. Cover furniture in rooms directly below the roof and close internal doors.
- Access. Keep the driveway and side paths clear so the crew can move materials safely, and keep children and pets well away from the work area.
- Communication. Agree on a daily check-in, even a short text, so you know what is planned and whether weather has changed anything.
If something worries you during the job, raise it straight away rather than waiting until the end. Small issues are much easier to sort out while the crew and equipment are still on site.
Quick reference
| Stage | Who is involved | Your role |
|---|---|---|
| Inspection and quote | Roofer | Share history, ask questions |
| Contract and permit | Roofer, local government | Sign contract, confirm permit |
| Prep and setup | Roofer, crew | Clear access, move items |
| Strip-off and repairs | Crew, possibly asbestos removalist | Approve any variations |
| New roof and clean-up | Crew | Final walk-through |
Ready to start
If you are thinking about a roof replacement, the first step is an inspection. Request a free on-site quote and we will arrange for a local roofing contractor to visit and talk you through the process for your home.